其实很多公司或者资深的开发都有自己快速创建项目的脚手架的,有的是魔改代码生成器实现,有的直接基于T4,RazorEngine等模板引擎打造;但无论如何,其最终目的其实就是搭建一个自定义项目模板(脚手架)。
今天我们聊聊:如何基于官方的cli donet new 命令创建自己的项目模板。
什么是项目模板我想用一个命令来说明:
dotnet new list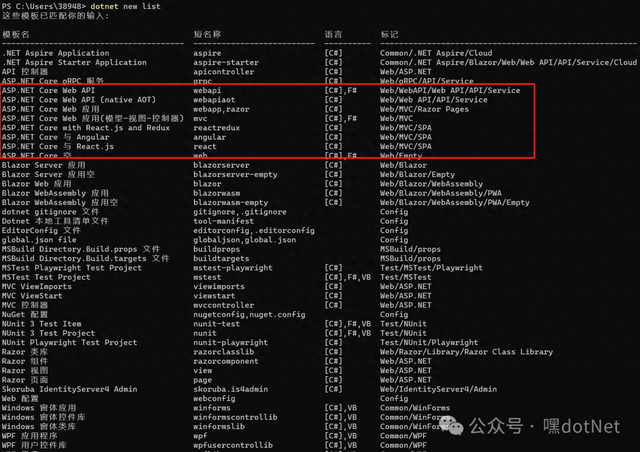 image-20240515170358858
到这里大家就非常熟悉了,原来大家平时创建项目都是基于已有的模板创建的(红圈部分大家应该不陌生);我们今天目的就是创建一个这样的模板,并在vs新建项目时可供选择创建项目,或者使用cli命令直接创建;
当然,还有公开模板:
https://dotnetnew.azurewebsites.net/
创建自己的模板1、先准备好一个项目这里准备的项目就是平时普通的项目,后面会以这个项目为蓝本创建模板;因为我最近使用Azure Function类型项目比较多,我就以Function项目为例,其他类型项目同理的;
项目结构图:
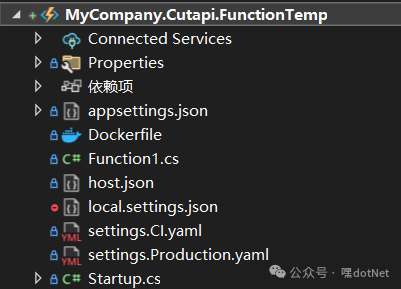 image-20240515171904545
项目文件结构:
D:.│ appsettings.CI.json│ appsettings.Development.json│ appsettings.json│ appsettings.Production.json│ Dockerfile│ Function1.cs│ host.json│ local.settings.json│ MyCompany.Cutapi.FunctionTemp.csproj #这个名字后面要被替换的│ settings.CI.yaml│ settings.Production.yaml│ Startup.cs│├─build│ CD.yaml│ CI.yaml│ _deploy.yaml│└─deploy │ kustomization.yaml │ ├─base │ deploy.yaml │ kustomization.yaml │ ├─ci │ deploy.yaml │ kustomization.yaml │ └─prod deploy.yaml kustomization.yaml可以看到其实有很多跟构建,部署等有关的配置文件;
Function1.cs
#模板项目的命名空间namespace MyCompany.Cutapi.FunctionTemp { public Function1 { private readonly Stopwatch _sw; private readonly IExtractSegmentService _extractSegmentService; private readonly ILogger<Function1> _logger; public Function1(IExtractSegmentService extractSegmentService, ILogger<Function1> logger) { _sw = new Stopwatch(); _extractSegmentService = extractSegmentService; _logger = logger; }#模板项目的FunctionName 和一些跟队列有关的配置,这些后面都要 [FunctionName("function1")] [return: ServiceBus("cutapi-queue1-notify", Connection = "ServiceBusConnection")] public async Task<VideoTranscodeNotify> Run([ServiceBusTrigger("cutapi-queue1", Connection = "ServiceBusConnection")] ServiceBusReceivedMessage message , string messageId , ServiceBusMessageActions messageActions , Int32 deliveryCount , DateTime enqueuedTimeUtc , ILogger log ) { _sw.Start(); var messageBody = Encoding.UTF8.GetString(message.Body); log.LogInformation($"{Environment.MachineName} -> function1 begin ->{messageId}: {messageBody}"); await messageActions.CompleteMessageAsync(message); var result = new VideoTranscodeNotify(); try { //todo... } catch (Exception ex) { log.LogError(ex, $"{Environment.MachineName} -> {messageId}:function1 Exception:{ex.Message}"); } _sw.Stop(); log.LogInformation($"{Environment.MachineName} function1 Over ->{messageId} Elapsed: {_sw.Elapsed}");return result; } }}以这个文件为例,模板项目里很多文件内容都可以按自定义参数被替换;当然文件名也可以替换;
2、创建配置文件在项目根目录下创建配置文件:/.template.config/template.json
结构如下:
├─.template.config │ template.json
内容:
{"author": "Heiner Wang", //作者"classifications": [ "Azure Functions" ], //项目归类ifications 还会出现在“Tags”列中"name": "Heiner Function", //项目全名,用户应看到的模板名称。"identity": "HeinerFunction", //项目唯一id"shortName": "hfunc", //项目简写"tags": {"language": "C#","type": "project" },"sourceName": "MyCompany.Cutapi.FunctionTemp", //运行模板时使用 -n 或 --name 选项提供要替换的值,不写了话项目名称不变"preferNameDirectory": true, //创建项目的目录层级;"symbols": { //自定义语法 //自定义参数,新项目命名空间"Namespace": {"type": "parameter","dataType": "text", //文本类型"defaultValue": "Heiner.Function","replaces": "MyCompany.Cutapi.FunctionTemp" //项目里这个值将会被替换掉 //"fileRename": "MyCompany.Cutapi.FunctionTemp" //也可以指定替换文件名 },"FunctionName": {"type": "parameter","dataType": "text","defaultValue": "function1","replaces": "function1" },"QueueName": {"type": "parameter","dataType": "text","defaultValue": "cutapi-queue1","replaces": "cutapi-queue1" },"EnableRedis": {"type": "parameter","dataType": "bool", #布尔类型的"defaultValue": "true" } }}更多参数请参考:https://github.com/dotnet/templating/wiki/Reference-for-template.json
代码段过滤cs文件
//EnableRedis是自定义参数#if (EnableRedis) ConnectionMultiplexer redisConnection = ConnectionMultiplexer.Connect(AppSettings.GetConnectionString("Redis")); builder.Services.AddSingleton<IConnectionMultiplexer>(redisConnection); builder.Services.AddSingleton<IDatabase>(c => redisConnection.GetDatabase());#endif项目文件
<ItemGroup> <PackageReference Include="Microsoft.Azure.Functions.Extensions" Version="1.1.0" /> <PackageReference Include="Microsoft.Azure.WebJobs.Extensions.DurableTask" Version="2.9.0" /> <PackageReference Include="Microsoft.Azure.WebJobs.Extensions.ServiceBus" Version="5.9.0" /> <PackageReference Include="Microsoft.NET.Sdk.Functions" Version="4.1.1" /> <PackageReference Include="Microsoft.VisualStudio.Azure.Containers.Tools.Targets" Version="1.19.5" /></ItemGroup> <ItemGroup Condition="'$(EnableRedis)' == 'True' "> <PackageReference Include="StackExchange.Redis" Version="2.6.48" /></ItemGroup> 文件过滤模板文件加入如下配置
"symbols":{...},"sources": [ {"modifiers": [ {"condition": "(!EnableRedis)", //EnableRedis!=true"exclude": [ //排除下面的文件(这里仅做示例),后面的模板项目当设置参数:EnableRedis==false时,下面的文件就被过滤掉了"src/MyCompany.Cutapi.FunctionTemp/Redis.cs", ] } ] } ] 3、执行模板安装这一步是将根据配置文件,将普通项目安装成一个项目模板,理论上创建自定义模板到这步就完成了;
项目根目录执行:
dotnet new install .这里命令后面的`.` 是安装当前目录的项目的意思;dotnet new install D:\MyCompany.Cutapi.FunctionTemp也可以这样,用绝对路径更新模板强制覆盖安装
dotnet new install . --force先删除再安装
#先删除dotnet new uninstall .#重新安装dotnet new install .后面的.都代表在项目根目录执行,后面不再赘述;
4、检查安装结果dotnet new list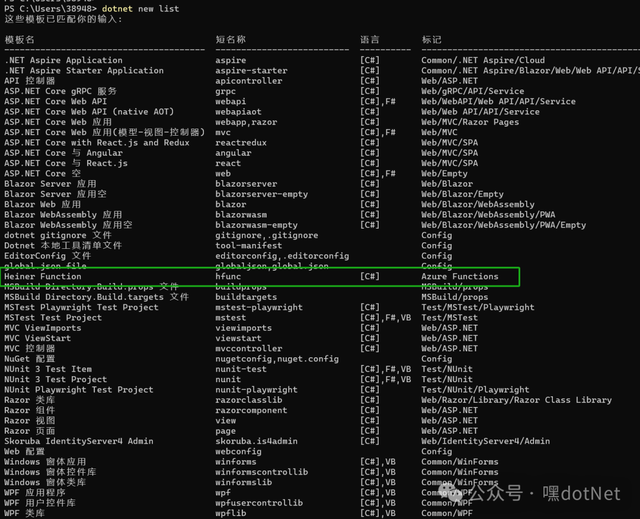 image-20240515180319820
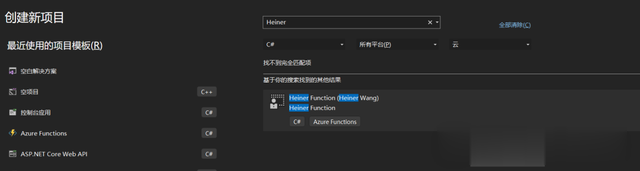 image-20240515180417880
无论用cli还是vs 都可以看到我们项目模板了,创建模板成功;
参考
5、推送到nuget服务端(可选)这步是可选的!注意!很多内部模板要脱密处理后再执行推送,请勿将机密信息推送到公网;
1、模板项目根目录创建文件MyCompany.Cutapi.FunctionTemp.nuspec<?xml version="1.0"?><package ><metadata> <id>HeinerFunction</id> <version>1.0.0</version> <authors>Heiner Wang</authors> <owners>Heiner Wang</owners> <requireLicenseAcceptance>false</requireLicenseAcceptance> <description>xxx 公司 Azure Function 快速模板.</description> <tags>dotnet-new;template</tags></metadata><files> <file src="**\*" target="content"/></files></package>2、生成nuget包在项目根目录执行
nuget pack MyCompany.Cutapi.FunctionTemp.nuspec生成nuget包:
HeinerFunction.1.0.0.nupkg
3、推送到服务端nuget push HeinerFunction.1.0.0.nupkg -Source https://api.nuget.org/v3/index.json -ApiKey YOUR_API_KEY这步的--Source参数,如果你有搭建好自己的nuget服务端的话改成你自己的;
如何使用一个模板模板有了,怎么用这个就简单了;
vs使用在创建项目时直接选择自定义模板
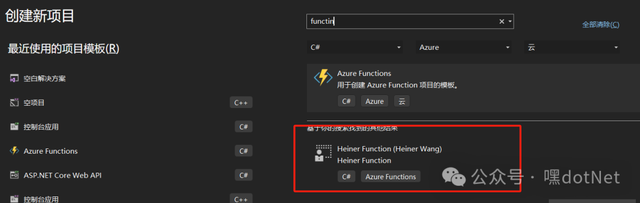 image-20240516093813918
不过这样的话,自定义参数都是用默认值,所以我还是更推荐用命令行方式;
命令行使用(推荐)大家做demo的时候都应该执行过这样的命令,其实这就是使用了官方shotname为console的模板
dotnet new console -n MyConsoleApp1一样,自定义模板命令为:
#默认参数dotnet new hfunc -n MyCompany.Heiner.Test #指定参数dotnet new hfunc -n MyCompany.Heiner.Test --Namespace MyCompany.Heiner.Test --FunctionName function-live-record --QueueName cutapi-live-record --EnableRedis false创建成功
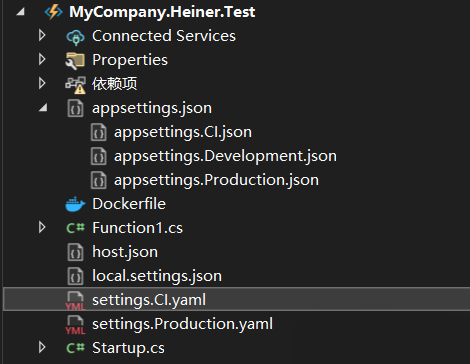 image-20240516155502856[参考]
https://learn.microsoft.com/zh-cn/dotnet/core/tools/custom-templates
https://cloud.tencent.com/developer/article/2319366
https://github.com/dotnet/templating/wiki/Reference-for-template.json